Tuesday, September 4, 2012

Crib Teething Cover

Crib Teething Cover


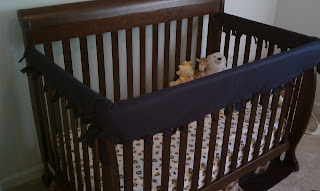
My Son has now decided his crib is his newest teething ring so in an effort to prevent any further damage I made these handy and super easy covers.
 
 
What you will need to do is measure your crib. I bought 5 feet of navy blue fleece and had some left over. Cut fleece into three strips, two the length of the short sides and then one long one for the front. The front panel will have to be wider than the sides. I left about 5 inches extra on either side to the rail for the ties. You are essentially making a tie blanket over the crib rail. My front panel was also 2 inches longer in length on either side so I could wrap it over to the sides. You then cut strips on either side of the bed slats. On the ends I cut two so you can tie it over to the side. I made small snips and then folded the fabric in half and laid it out on the floor to actually make the ties. This allowed for both sides to match up. Once you have it cut lay it back over the rail and tie every other strip. The strips that are on the slats, you just tuck up inside the cover. It took a total of 30 minutes and cost under $5 (Cost will depend on the price of fleece and amount you need).

Finished Product       
Saturday, September 1, 2012

Snowman Cans

Old soup cans turned into cute Christmas decorations. I just washed the cans and painted with acrylic paints I had around the house. Its a super cheap and totally adorable craft.  I'm not finished with how I'll display them at Christmas but here they are after painting.


Check back to see the final project!!

Baby foot impression Stepping Stone

Garden Stepping Stone

Mix 1/2 cup flower, 1/2 cup salt, and about 1/4 cup water. Kneed into dough and then roll out into what ever shape you'd like. Make impression and then bake at 200 degrees for 3 hours. I wrote my sons name and the year on the from and on the back I put the actual date we made it. You could also paint it or make smaller ornaments for the Christmas tree. I love knowing I will always have a memory of his precious little foot. I plan to make on every year on his birthday.

Friday, August 31, 2012

"Its a Boy" Diaper Wreath

Diaper Wreath
 
 This super easy and cute wreath makes for a great baby shower gift/ decoration. I made this one for my nephew.

What you will need:
-Children's hula hoop
-about 30 newborn diapers
-ribbon
-baby items to attach (I choose a bottle brush, 2 pacifiers, frog teething ring, lotion, and bottles)

I want all of the parts of the wreath to be usable so I found a children's hula hoop at the dollar store. My 10 month old had a blast playing with it. But you could also use a foam wreath. You open the diapers and fold over the hoop. I tied them with "Its a boy" ribbon but you could use string or small rubber bands. You attach the diapers all the way around the wreath. Once it is covered then you just tie on the other baby items and a longer string to hang it and there ya go!


Saturday, August 25, 2012

Fourth of July Wreath

This is such a simple wreath. It took about 15 sets of the red, white and blue flowers, 4" blue ribbon, and I cut the stars from white foam paper. Its made on a foam wreath. I began hot glueing the flowers along the wreath. Once I had the flowers how I liked I covered the rest of the wreath with the ribbon and secured it with hot glue. Then I glued the stars to the ribbon. And done. Super easy but totally adorable. I think Im going to get a wooden inital and stray paint it gold to hang in the center.


Friday, August 24, 2012

Burlap Wreath

 
What you will need:
-2.5 yards of burlap
-wire wreath
-floral wire
-ribbon
-Flowers
-scissors
-needle and thread

I bought a yard and a half for burlap fabric from Walmart for $2.97/ yard. I cut it into strip or various widths, most were about 2.5 inches wide. I then stitched the strips together to make a garland. This took a little more time but cost a lot less than buying the rolls of burlap garland. I'm a stay at home mommy so I have plenty of time. Then take one end of the garland and attach it to the wreath with the floral wire. I just pushed the wire through the fabric and twisted the wire together. Once the burlap is attached you begin pulling the garland through the wreath from the back to make the loops. I twisted the burlap so the loops were not all going the same direction. I think it made it look fuller, continue to pull the garland through until the entire wreath is covered. Attach the other end of the garland to the back of the wreath with another piece of floral wire. I added the fall flowers and a red bow to hang it. I haven't found a larger ribbon I like so for now its a thin red one.

The total cost was under $25. I loved how it turned out and may keep it up all year round and just change out the flowers.

Valentines Day Cards


Here are some of my homemade Valentines Day Cards.